
Simple RAG Tutorial
Reading about RAG is easy. Building one is where the real learning happens—because the first pipeline you run will almost certainly fail in ways no diagram…

Key topics
Reading about RAG is easy. Building one is where the real learning happens—because the first pipeline you run will almost certainly fail in ways no diagram warned you about. That is the point. This tutorial walks you through the smallest working RAG example, stage by stage, so you can see exactly where retrieval succeeds, where it breaks, and what to do about it.
What You'll Build and Why It Matters
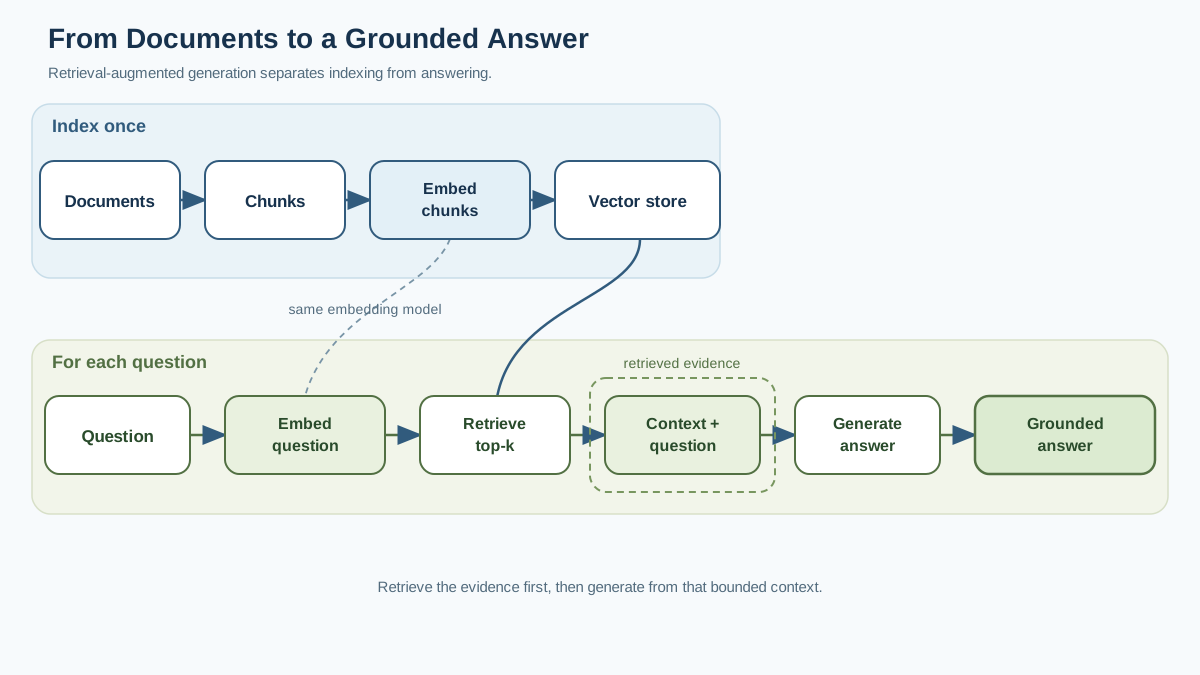
You're going to build a question-answering system over a small set of your own documents. A few text files or a short PDF is plenty. The deliverable is simple: ask a question in plain English, get an answer grounded in your documents rather than in whatever the model happens to remember.
The whole pipeline comes down to four stages:
- Load your documents.
- Chunk them into manageable pieces.
- Embed and store those chunks as vectors.
- Retrieve and generate—find the relevant chunks for a question, then have a model answer from that context.
This is a working prototype, not a production system. That distinction matters. A prototype's job is to force reality to answer: Does my chunking make sense? Is my retrieval finding the right evidence? Does the final answer actually come from my data? You cannot answer those questions by reading about RAG. You answer them by running the pipeline and inspecting what comes out.
Here's the mental model that will guide every decision you make: think of retrieval as deciding what earns space on a limited desk before the model answers. The model has a finite context window—a crowded desk with a larger surface area, but still a desk. Every irrelevant chunk you place on it takes space away from the evidence the model actually needs. Retrieval quality determines what lands on that desk, which means retrieval failures show up as bad answers long before the model is ever at fault.
If you need a refresher on what RAG is and why it exists, the concept guide covers that ground. Here, we're building.
Choosing Your Data and Setting Up
Pick a small, self-contained document set: 10 to 50 pages of text where you already know the answers. Your own notes, a manual for a tool you use, a handful of articles you wrote—anything where you can instantly tell whether a retrieved chunk is relevant.
That last part is the entire reason to start with familiar data. When you ask "What is the refund policy?" and the pipeline retrieves a chunk about shipping times, you should feel that wrongness immediately. With unfamiliar data, you cannot judge retrieval quality, and you will end up blaming the model for failures that started much earlier in the pipeline.
Keep the setup minimal. You need three things:
- A Python environment.
- An embedding model to convert text into vectors.
- A vector store to hold those vectors.
That is it. No Kubernetes, no distributed databases, no infrastructure ceremony. For storage, you have two broad options: a local vector index that lives in your project, or a hosted vector database you connect to over the network. Start with the local option. It removes network calls, API keys, and moving parts from the equation, which means when something breaks, the cause is easier to isolate. The same pipeline works with a hosted database later; the swap is a few lines of code, not an architectural change.
Step 1: Load and Chunk Your Documents
Raw documents are too large to retrieve well. A twenty-page PDF contains too much information to fit cleanly in a context window, and even if it did, most of it would be irrelevant to any single question. So you break documents into pieces—chunks—that the retrieval step can search and the model can actually use.
Chunking is the first quality lever in your pipeline, and it is the one beginners most often treat as an afterthought. The tradeoff is direct:
- Chunks too large bury the answer in surrounding noise. The retrieval step may find the right chunk, but the answer hides inside paragraphs of irrelevant material, and the model has to dig for it.
- Chunks too small lose the surrounding context. A chunk that ends mid-explanation may contain the right keywords but not enough information to answer anything.
A practical starting point is a few hundred characters per chunk with modest overlap between neighboring chunks. The overlap matters because answers often straddle chunk boundaries. If a question's answer starts at the end of one chunk and continues into the next, overlap ensures neither piece is orphaned.
Here is the beginner mistake to avoid: treating chunking as a mechanical detail you set once and forget. It is not. Chunk size and overlap directly shape what retrieval can find, which means they directly shape the quality of every answer that follows. You will tune these numbers later, after you see what your retrieval actually returns.
Knowledge check
Check your understanding
Answer this question before you continue.
Step 2: Embed and Store the Chunks
Once your documents are chunked, you need a way to search them by meaning rather than by keyword. That is what embeddings do.
An embedding is a list of numbers—a vector—that captures the meaning of a piece of text. The trick is that texts with similar meanings end up with similar vectors, which means they land close together in vector space. "How do I return this product?" and "What is the refund process?" produce vectors that sit near each other, even though they share almost no exact words.
At index time, you embed each chunk once and store the resulting vector alongside the original text. The vector is what gets searched; the text is what gets handed to the model later.
Your storage choice comes down to two options:
| Option | What it is | Best for |
|---|---|---|
| Local vector index | A library that stores vectors in a file on your machine | First prototypes, learning, no infrastructure |
| Hosted vector database | A service that stores and searches vectors for you | Larger datasets, production, team access |
Start local. The code is a few lines, and you avoid managing credentials and network calls while you are still debugging the fundamentals.
One rule will save you hours of confusion: the embedding model you use at query time must be the same model you used at index time. If you embed your documents with one model and your question with another, the vectors live in different spaces, and your similarity search will return garbage. This is a classic silent failure—the code runs without errors, and the results are just wrong.
Knowledge check
Check your understanding
Answer this question before you continue.
Step 3: Retrieve the Right Context
Now the pipeline comes alive. When a user asks a question, you embed that question with the same embedding model, run a similarity search against your stored vectors, and return the top matches—the chunks whose meaning sits closest to the question's meaning.
The number of chunks you return is called top-k, and it is a dial you will learn to turn deliberately:
- Too few chunks and the answer may simply be missing. The evidence exists in your documents, but retrieval never brought it to the desk.
- Too many chunks and you crowd the desk with noise. The relevant evidence gets diluted by irrelevant material, and the model has to separate signal from clutter.
Here is the debugging habit that separates people who build working RAG systems from people who stay confused: print the retrieved chunks before you generate anything, and read them yourself. Do not skip this step. Do not assume retrieval worked because the code ran without errors. Look at what actually came back. Is the chunk relevant? Does it contain the information needed to answer the question? Is anything missing?
Most first RAG failures are retrieval failures, not model failures. The model answered exactly as it should have—given the context it received. The problem was that the context was wrong, incomplete, or noisy. If you blame the model before inspecting retrieval, you will debug the wrong half of the system.
Knowledge check
Check your understanding
Answer this question before you continue.
Step 4: Generate a Grounded Answer
Retrieval has done its job: the relevant chunks are on the desk. Now the model does its job—answering from that evidence.
The prompt follows a consistent shape:
- The retrieved context.
- The user's question.
- An instruction to answer only from the provided context.
That grounding instruction is what separates RAG from asking the model cold. Without retrieved context, the model answers from whatever it learned during training—which may be outdated, incomplete, or simply wrong for your documents. With retrieved context, the model has a bounded evidence set to work from, and the instruction tells it to stay inside those bounds.
You can push this further by asking for citations. Instruct the model to reference which chunk or source each part of the answer came from. This does two things: it makes the answer verifiable against your documents, and it gives you a quick way to check whether the model actually used the retrieved evidence or drifted into its own knowledge.
The code here is minimal. The emphasis is on the prompt structure, not on any particular framework. Once you understand the shape—context plus question plus grounding instruction—you can build it with any LLM library or provider.
Knowledge check
Check your understanding
Answer this question before you continue.
Common Mistakes and How to Fix Them
When your pipeline misbehaves, work through this checklist before changing anything else.
Mismatched embedding models. If retrieval returns nonsense that has no apparent relationship to your question, check that the query-time embedding model matches the index-time model. This is the silent killer.
Chunking that splits answers across pieces. If retrieval finds the right neighborhood but the answer is incomplete, your chunks may be cutting explanations in half. Increase chunk size or overlap, then re-index and test again.
Too much noise crowding out the evidence. If the model's answer seems distracted or includes irrelevant details, lower top-k. The desk is crowded; give it less to work with.
Skipping the read-the-retrieval step. If you cannot explain why the model gave a particular answer, you have not looked at what retrieval actually returned. Print the chunks. Read them. This is non-negotiable.
Treating the first working run as finished. A pipeline that answers one question correctly has not proven anything. Test it with questions you already know the answers to—at least five of them, covering different parts of your documents. Wrong answers to known questions are the fastest way to find weak retrieval.
Where to Go From Here
Your pipeline works. Now make it better, deliberately.
Try different chunk sizes and overlap values, and watch how retrieval quality changes. Swap in a different embedding model and compare results on the same questions. Move to a larger document set and see where the simple approach starts to strain. Each change is an experiment with a visible outcome, and each outcome teaches you something about how the pieces interact.
Once the prototype is stable, you can start evaluating retrieval quality more formally—measuring how often the right chunks surface for known questions rather than relying on spot checks.
The natural next step is the bridge to agents. A RAG pipeline is a fixed retrieve-then-generate loop: every question triggers the same sequence. Agents change that equation. Instead of always retrieving, an agent can decide whether to retrieve, what to retrieve, and when to retrieve again—turning retrieval from a fixed step into a tool the model chooses to use. The pipeline you just built is the foundation that makes those decisions meaningful.
Here is your action item: build this pipeline over your own documents, using data you know well. Ask it five questions you already know the answers to. Read what retrieval returns for each one. Then look at whether the model's answers match what you know to be true. That run—with its failures, surprises, and small victories—will teach you more about RAG than any diagram ever could.
Knowledge check
Final check
Finish the article by checking the ideas you just learned.
References
Research updated Sep 7, 2026


